Quiltrelated
  • Home
  • Peggy's Prattles
  • Book Order
  • Quilt gallery

Courthouse Rotunda

6/13/2015

5 Comments

 
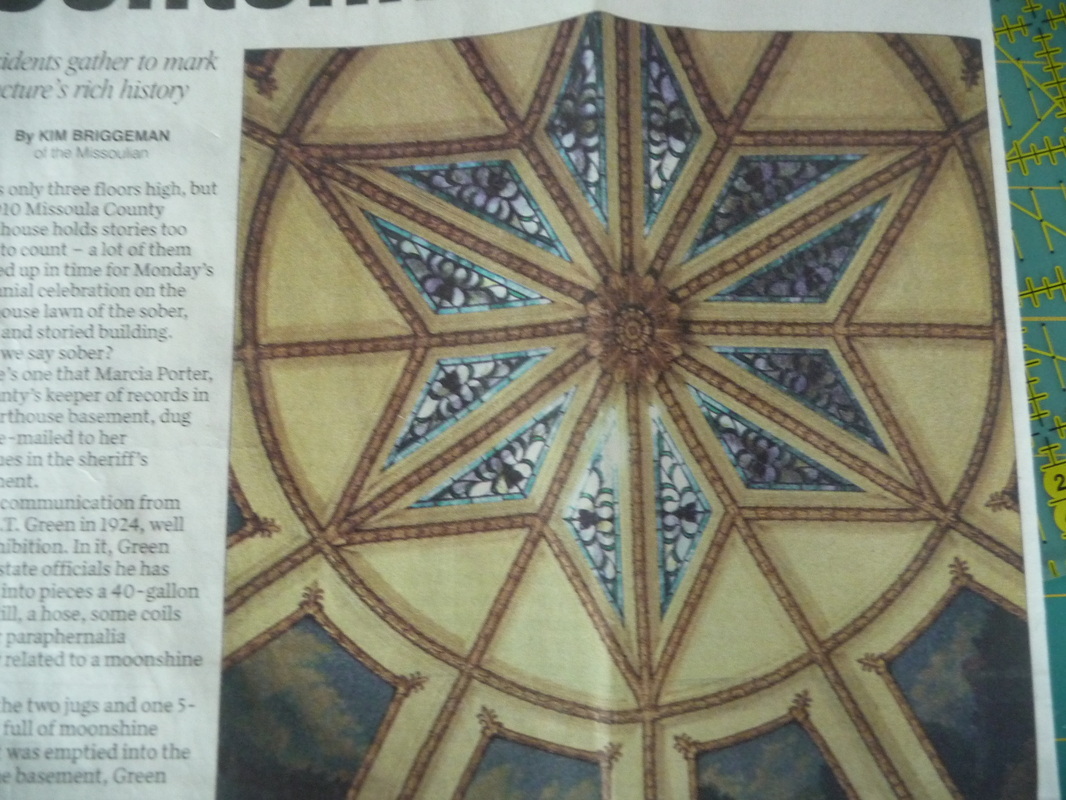
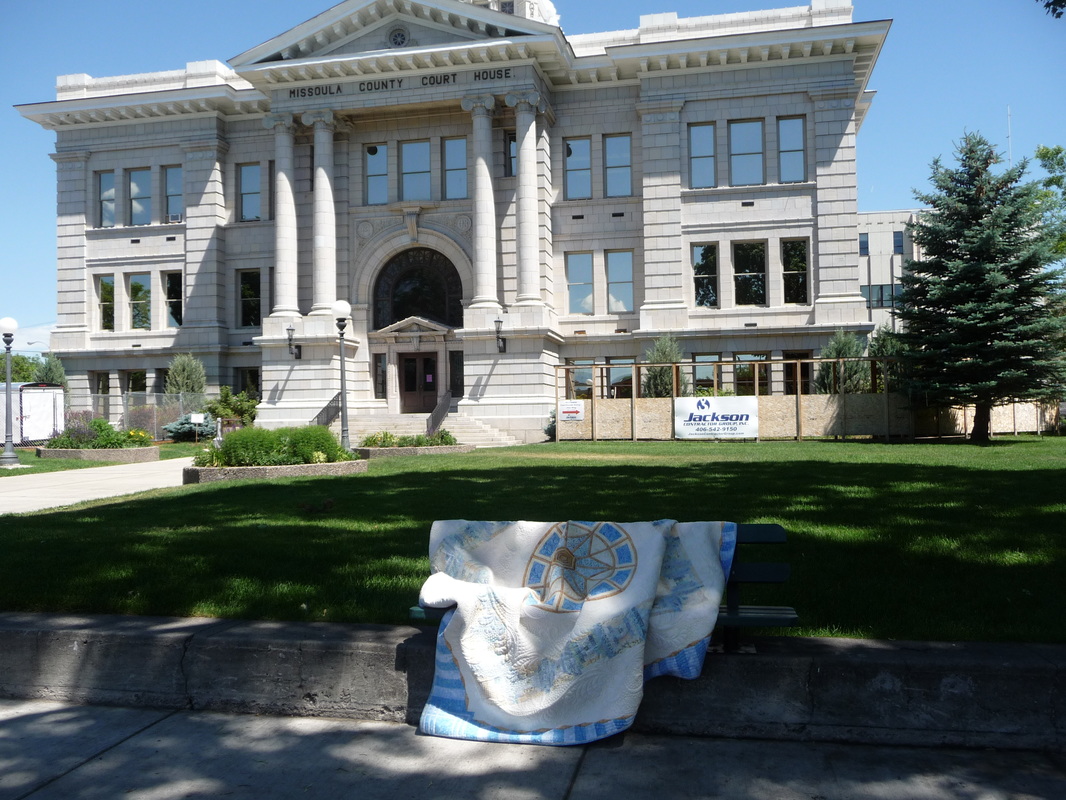
 Courthouse Rotunda started with this picture of the county courthouse rotunda in the local newspaper...
Picture
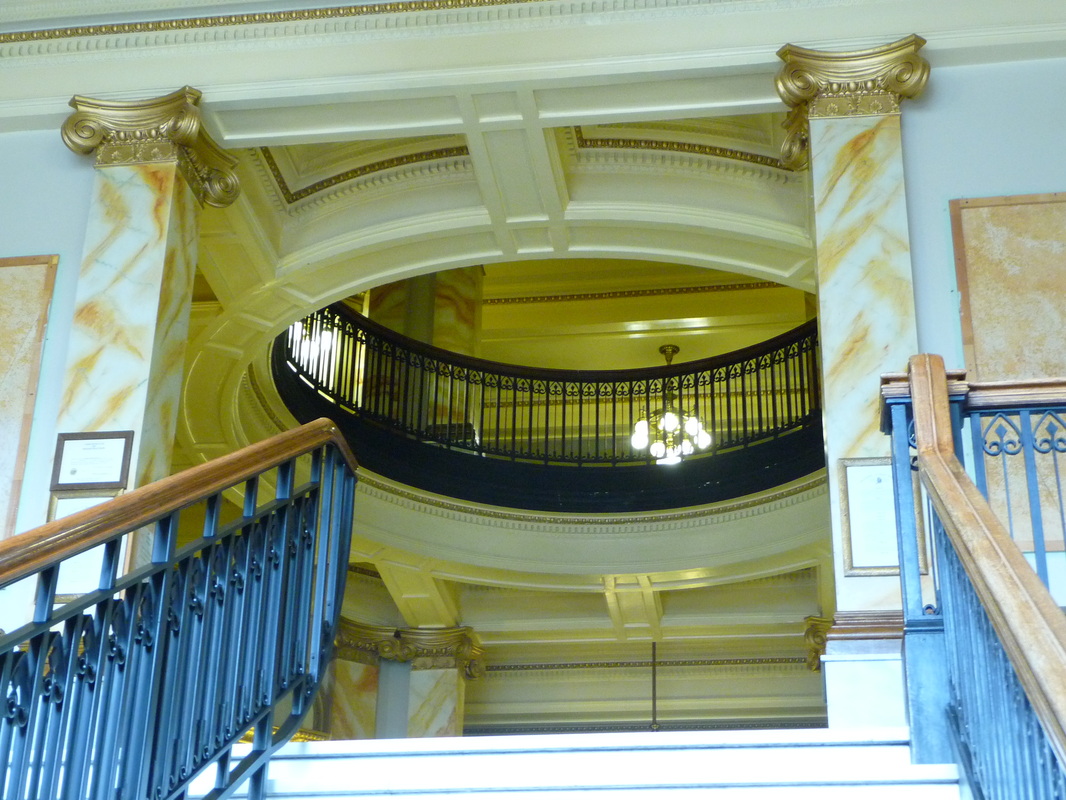
First I took a multitude of pictures for study and reference...
Picture
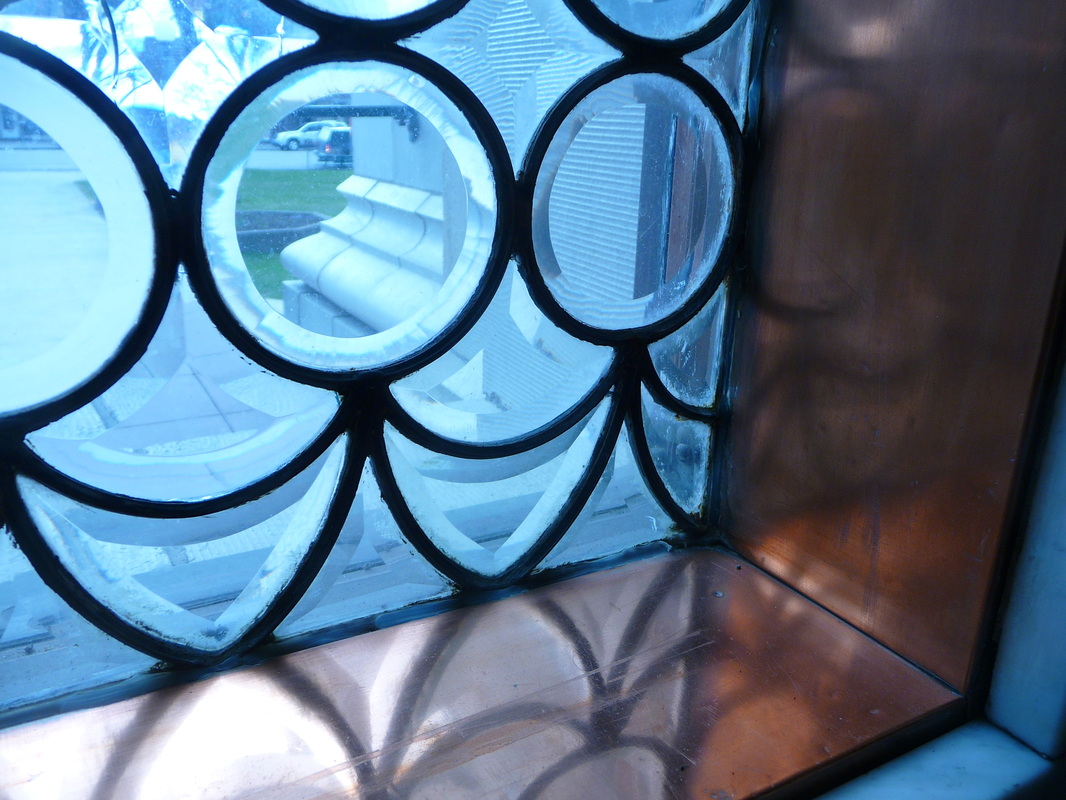
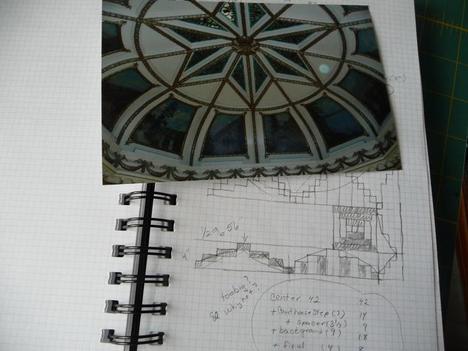
I love the copper window sill....
Picture
Picture
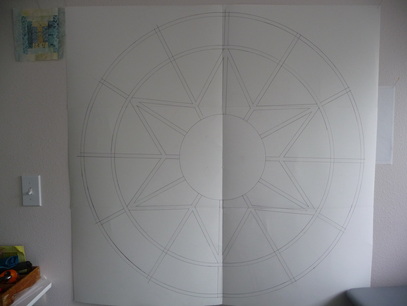
...Then it was time to draft.....

I knew that I wanted this to be a piece with plenty of negative space for quilting, and I also knew that I wanted it to be subtle colors.
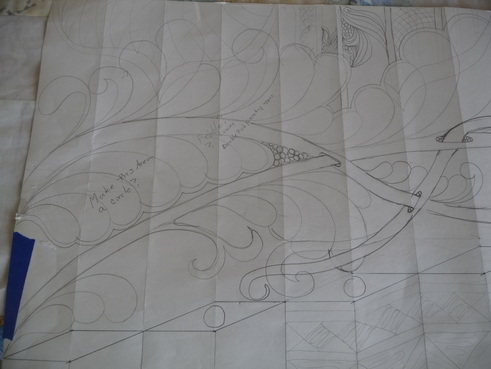
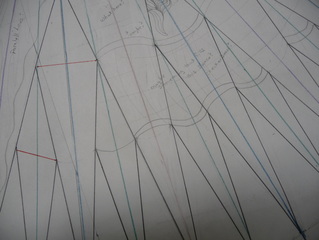
Lots of weird sketching ensued.  This shows some of the exploration for the borders.


Picture
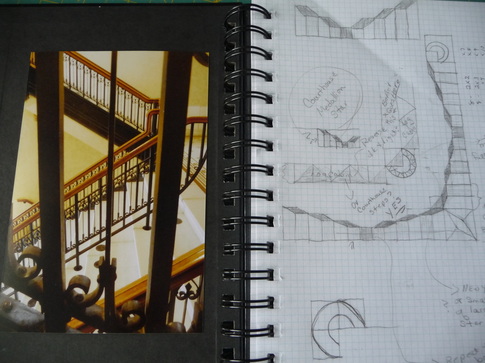
My goal was to create some kind of motion in the border rather than the expected straight lines that result from adding simple borders.
Picture
Picture
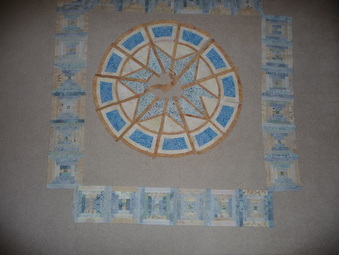
I began with the medallion.  And, yes, I do make piecing mistakes!  And I correct them! 
I then made the Courthouse Steps blocks to determine the needed size of the background for the medallion. 

The medallion was hand-appliqued to the background.  Uneven Log Cabin blocks were added for cornerstones, and a coping strip was added to accommodate the border.

Picture
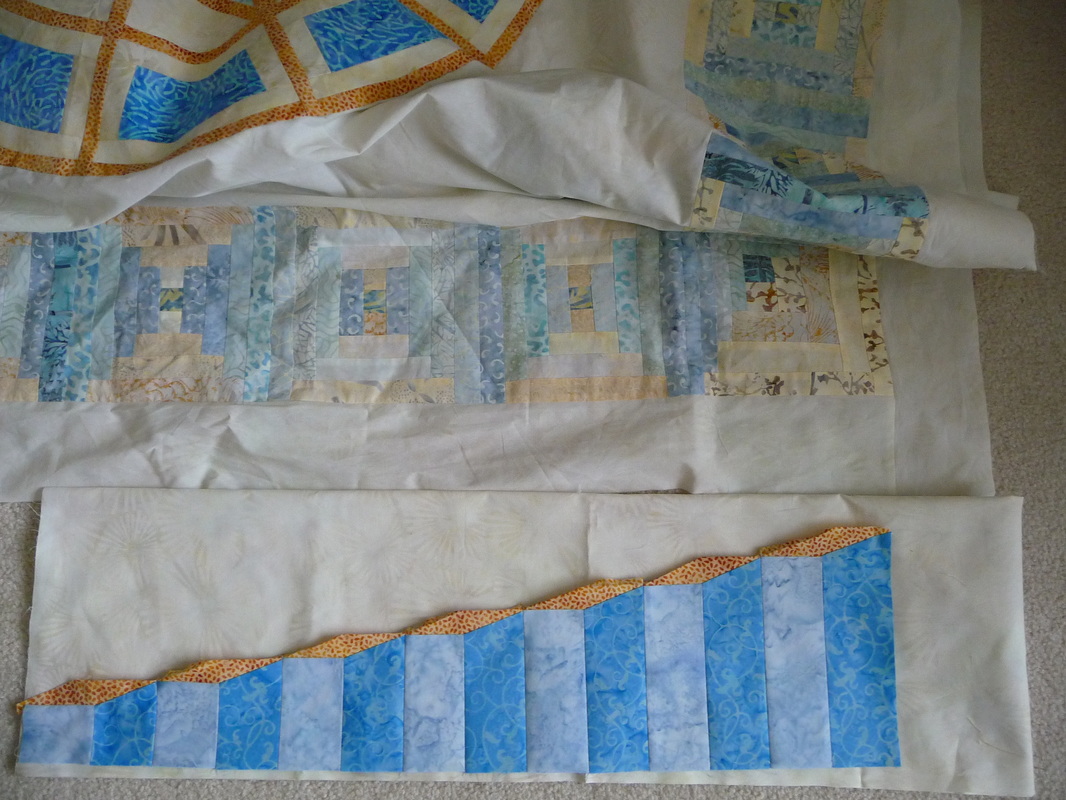
The columns were machine-pieced in pairs, then the tiny gold diamonds were added.  Finally the individual columns were stitched together. 
These units were then hand-appliqued onto a base of background fabric.  The excess fabric was trimmed from behind the border as well as behind the medallion.


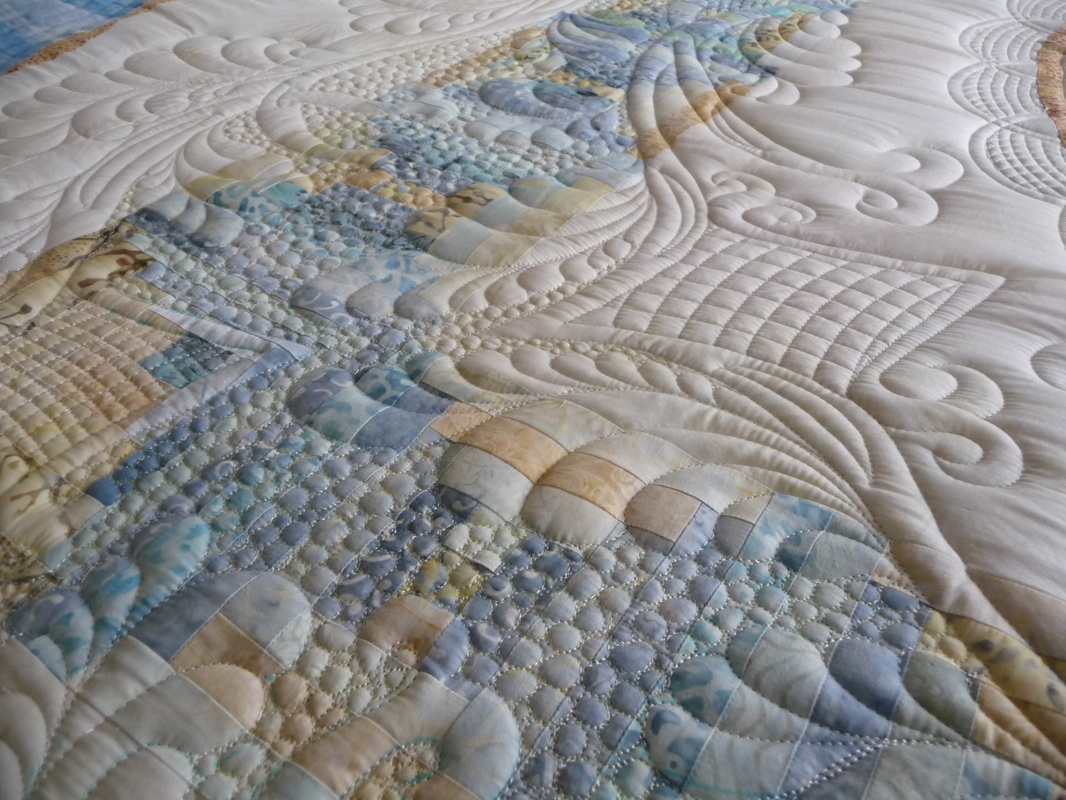
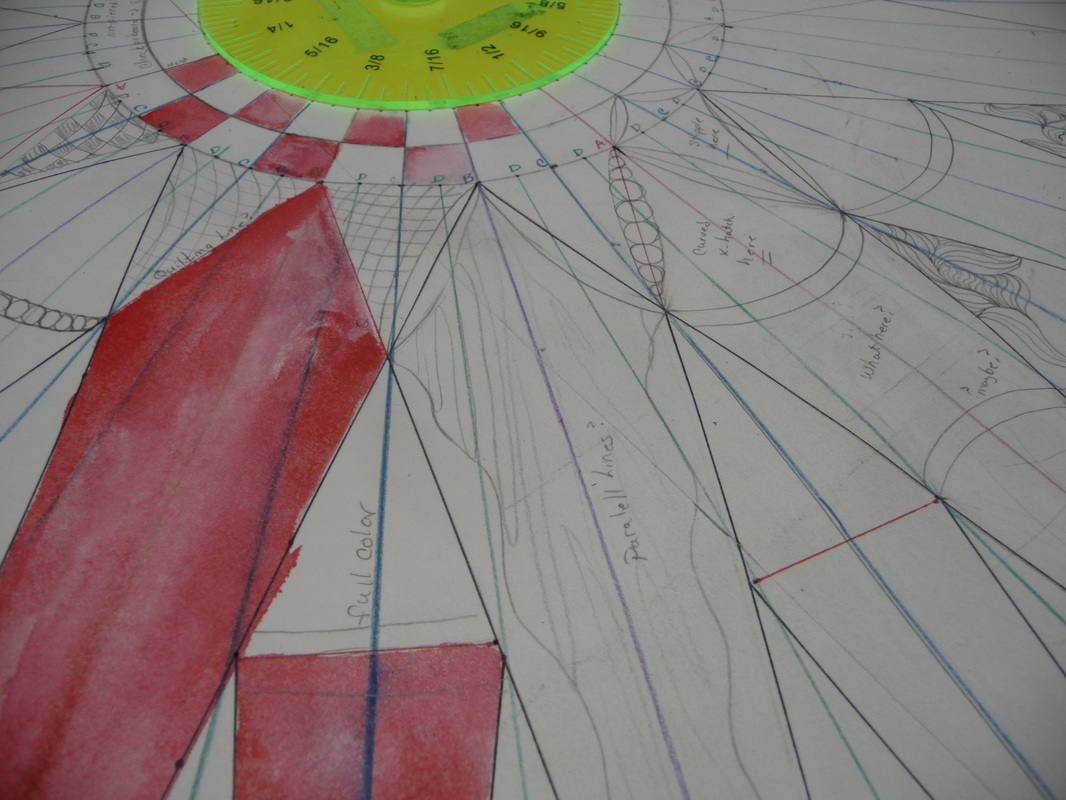
Then it was time to determine quilting motifs.  I wanted the quilting to frame the center of the quilt, and I also wanted to ignore the piecing of the Courthouse Steps border.  Lots of options were considered.
Picture
Picture
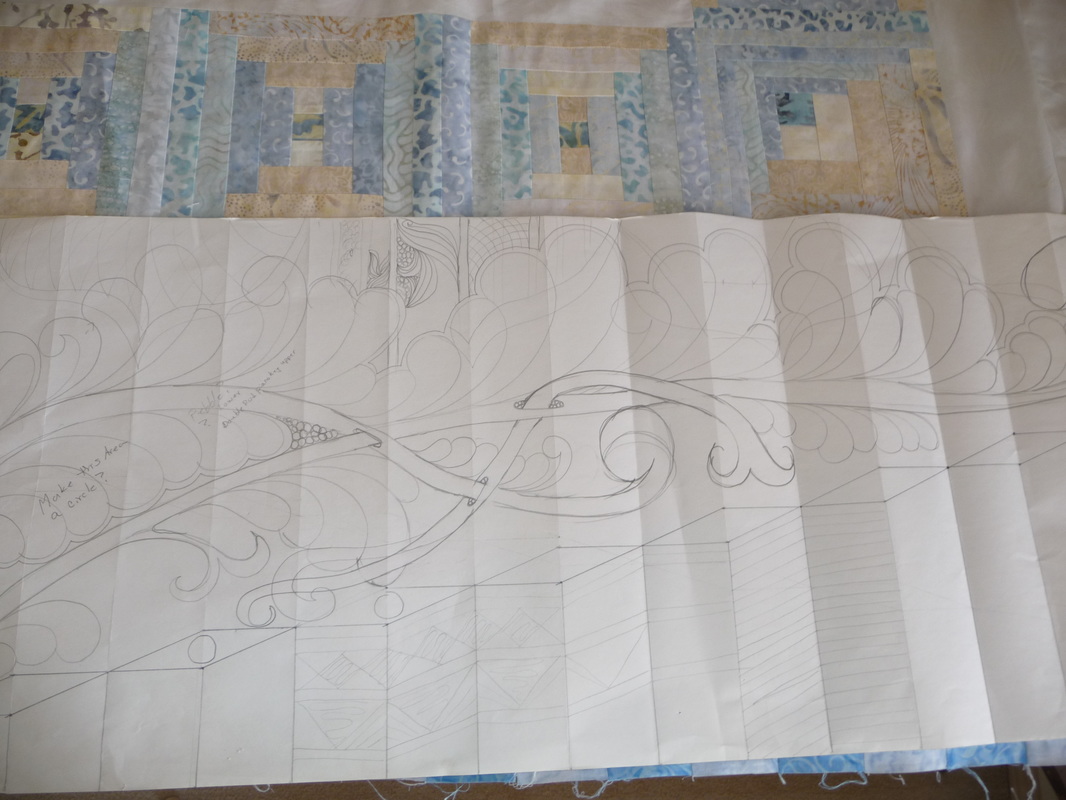
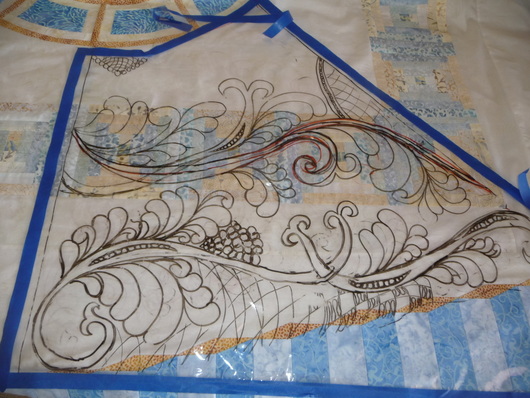
I made notes and considered fills.


Clear plastic helps me audition ideas and make corrections.  Eventually quilting begins.
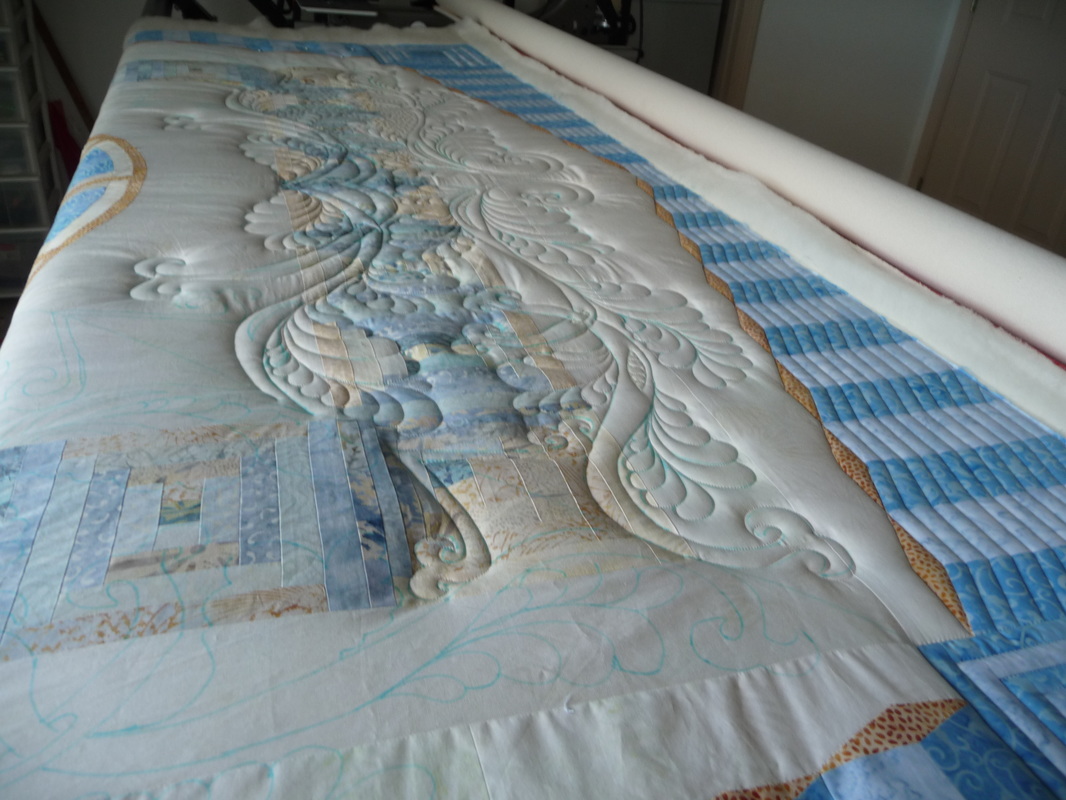
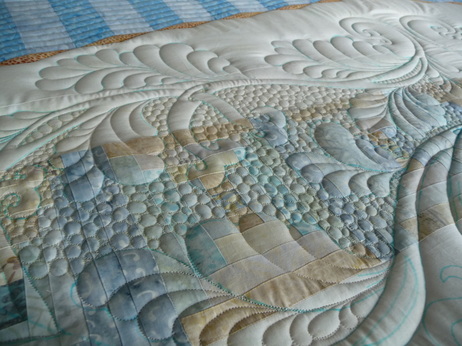
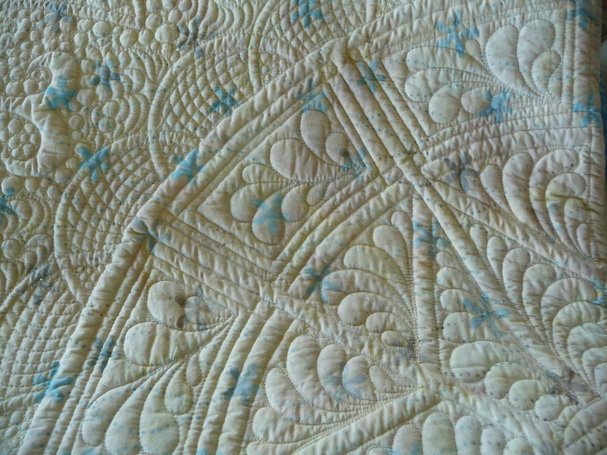


Picture
Picture
Picture
And goes on...

And on...
Picture
And on!
Picture
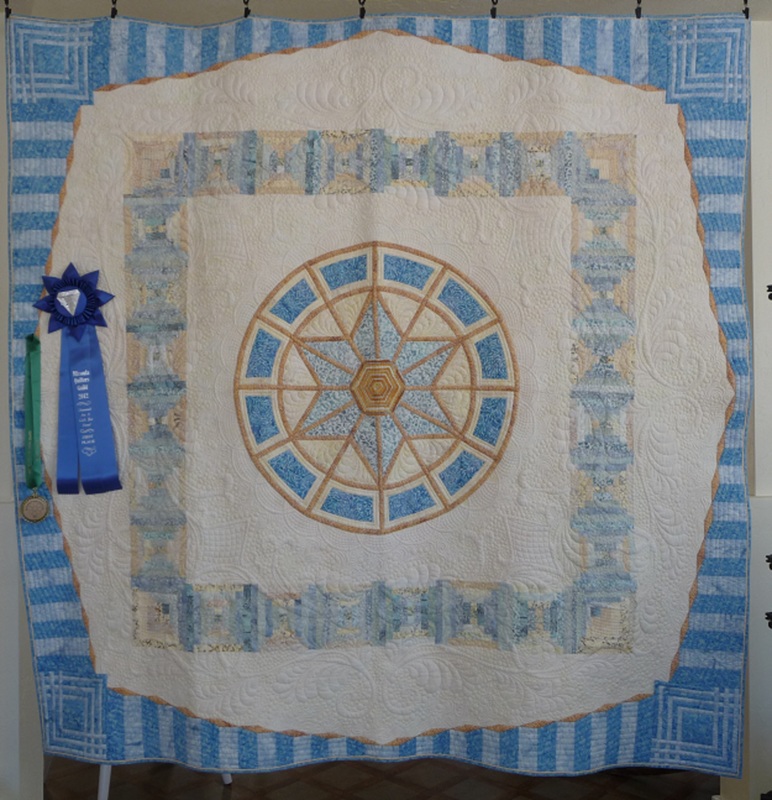
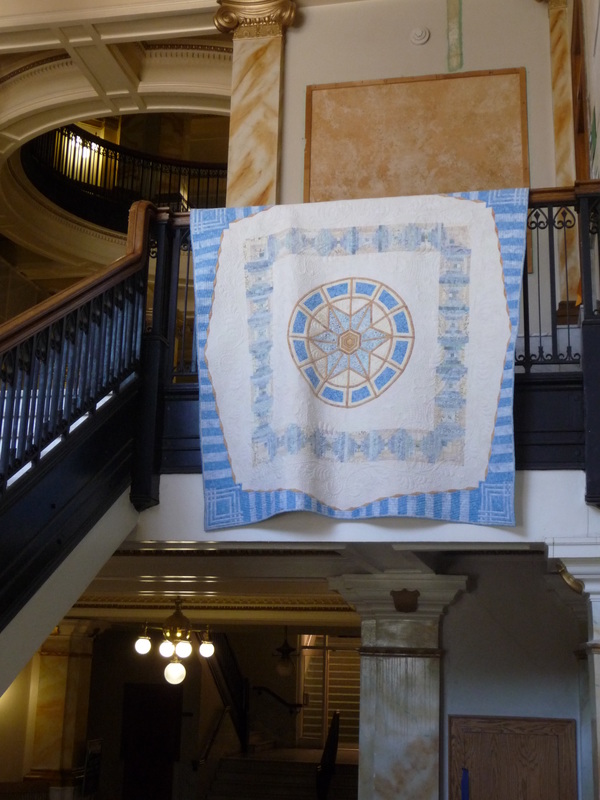
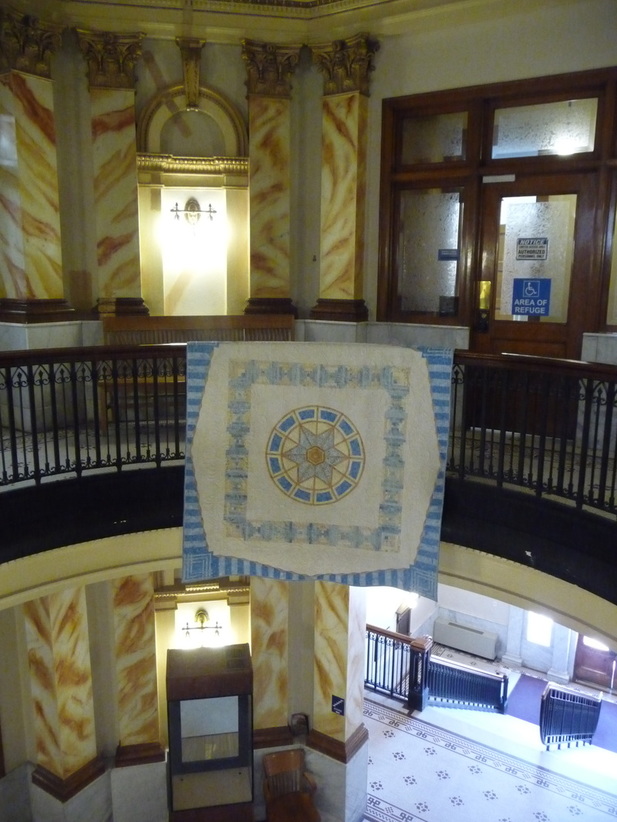
At last it is finished and hanging at a quilt show, complete with ribbons.
Picture
I just recently took it on location.  Back to the courthouse ....


Picture
Picture
Picture
Picture
Picture
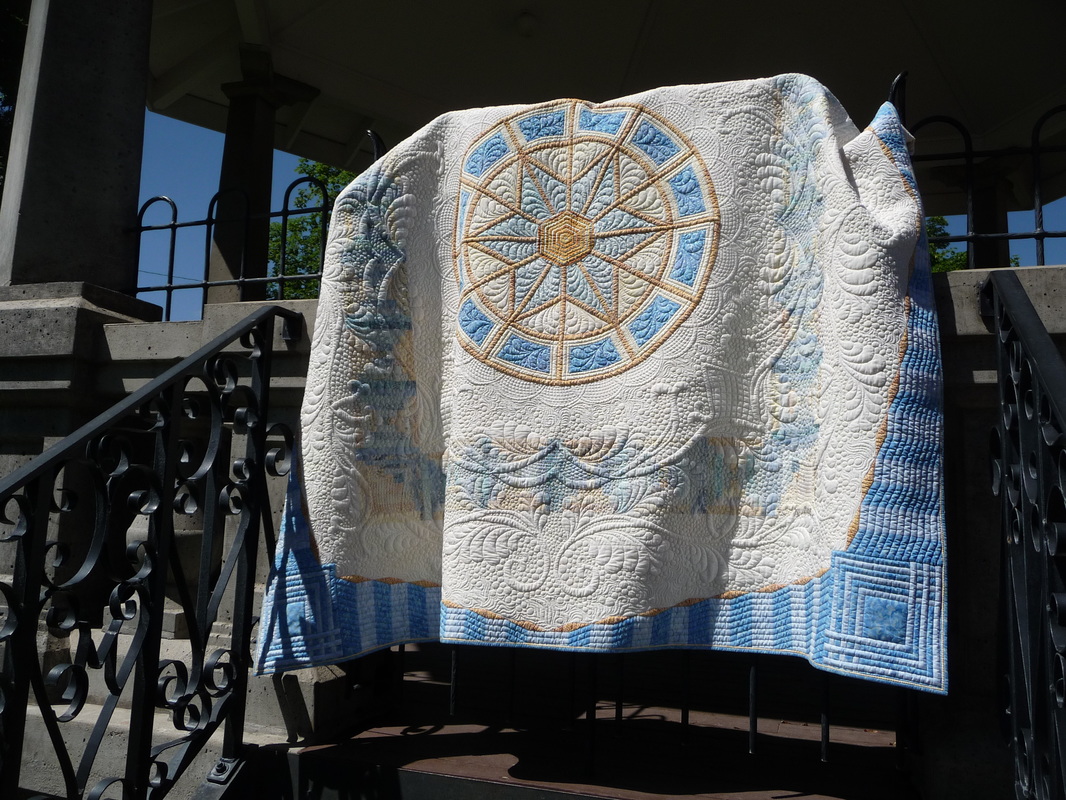
As with all quilts, there are things I would do differently.  I chose to quilt the outer border with straight lines fairly close together.  The quilt was perfectly square and flat.  However, the density of the stitching combined with a double batting of 80/20 and wool caused the border to ripple, and no amount of blocking has solved that.
As a result, the quilt was never entered in "name" shows which was my original intent.
Still, I am pleased with the quilt, and so many things worked out just as I had hoped...especially the quilting. 

Every quilt is just practice for the next one.
This is on the drawing board now.  No telling when it will be "born", but it has its possibilities.  All in good time.

Picture
Picture
5 Comments
Leeanne link
6/13/2015 05:25:34 pm

STUNNING! The most amazing wow factor!

Reply
Karen Miller link
10/15/2015 08:23:18 pm

Peggy -- thank you for all the fine details and information about your design and quilting process. The design and quilt are amazingly beautiful - certainly a labor of love. I have a couple of questions... Would you mind if I share an image or two from your blog on a Facebook group that I host that promotes Free Motion Quilting ( I have your feathers book - Love it!!). I, of course, would include the URL back to your blog with the images. Also, I would LOVE to quote your "Every quilt is just practice for the next one" to the group and maybe on my Redbird page too... is that OK with you? Lastly, I'm intrigued as to the ripple in the outer border. YOu mentioned you think it's the double layer of batting that could be the cause. I often use a layer of 100% cotton and 100% wool and I have seen a similar effect on a MUCH SMALLER quilt... is it that combination ? I always assumed it was the density of the quilting (I FMQ on a domestic machine). ANyway - it's been my pleasure to read through your blog tonight - I appreciate any feedback you can provide. Thanks much, Karen

Reply
Peggy link
10/20/2015 08:41:15 am

Thank you, Karen.

I have no objection to your sharing of the images as long as I am credited.

You may also quote my mantra "Every quilt is just practice for the next one." It is not an original concept, but I do think it bears remembering.

About the rippling of the final border. I think it is a combination of things, one factor being the double batting. Another is the density. But I think the final straw was the choice of the quilting. I used a ruler to stitch those straight lines, and I think that just sliding the ruler from one spot to the next distorted the fabric enough to cause the ripples. In hindsight, I might have been wiser to stitch vertical lines instead of horizontal lines, but I was trying to emphasize the 3D effect of the two colors of the columns.

I often use double batting with great results.

It may also be that the piping distorted the edge, but I have inserted piping in a lot of quilts with good success.

All I know for sure is that the top was perfectly flat when it was loaded on the machine!

Reply
Susan Stitch
11/4/2016 04:09:36 am

This is amazing! I really appreciate how you show us step by step the way you created the design, pieced it, and quilted it. The quilt is fabulous. I have a question -- how did you sew all those gold diamonds to the white background fabric? The white appears to be a solid piece -- and I can't imagine sewing all those inset seams!

Reply
Peggy
11/4/2016 08:41:58 am

Thank you, Susan. The entire pieced final border was created first in sections. Once the border was assembled, I hand appliqued it to a strip of background fabric. The excess background fabric was then trimmed. It wasn't as labor intensive as it sounds, actually.

Reply


Leave a Reply.

    Picture

    Author

    In addition to my first love of quilting I am also active in my church and enjoy singing in our community chorus.  My loves also include my two little grandchildren~~Zora Rose, and Linden Rustle.

    Archives

    November 2015
    June 2015
    November 2013
    December 2012
    September 2012
    June 2012
    May 2012
    March 2012
    February 2012
    January 2012
    December 2011
    November 2011
    October 2011

    Categories

    All
    Aqs Book
    Arts And Crafts
    Bach
    Birch Tree
    Book
    Bullion Stitch
    Buttons
    Colorful Music
    Construction
    Create Your Own Dream Feathers
    Cup Of Tea
    Dorset Buttons
    First Post
    Hearing In Color
    House Building
    Journals
    Karen Ruane
    Making Fabric
    Needleweaving
    Papier Mache
    Papier-mache
    Quilting Design
    Resolutions
    Simple Little Things
    Simple Pleasures; Eggs
    Soy Wax Batik
    Tarts
    The Impatient Artist
    Thread Lace
    Web Stitch
    Winter Inspirations

    RSS Feed

Powered by
✕